
Welcome to MCloud9, where we make web hosting easy and exciting! In this article, we’ll guide you through the process of purchasing a web hosting plan, even if you have no technical experience. We’ll show you step-by-step how to get started and explain the benefits of choosing MCloud9 as your hosting provider. With over 5.18 billion internet users worldwide, it’s the perfect time to start setting up your online presence. Let’s dive in!
Table of Contents
What is Web Hosting?
Before we begin, let’s quickly cover what web hosting is. Web hosting is a service that allows you to make your website accessible to the world. When you create a website, you need a place to store all your files and make them available online. That’s where web hosting comes in. It provides you with the server space, tools, and resources needed to keep your website up and running smoothly. To learn more about web hosting services check out our article: What Is Web Hosting? An Easy Guide to Web Hosting Services.
Purchasing a MCloud9 Web Hosting Plan
Let’s walk through the process of purchasing a web hosting plan step-by-step:
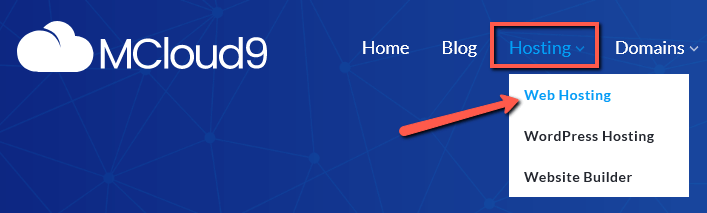
Step 1: Visit the MCloud9 Web Hosting Page
Start by visiting the MCloud9 website and navigating to our web hosting page. You can find it easily in the top menu under “Hosting.”
Step 2: Select Your Web Hosting Plan
Take a moment to decide on the best web hosting plan for your needs. Consider the amount of storage required for your website, along with email accounts and other resources. Our most popular plan is Alto Starter, which offers ample SSD storage suitable for most small-to-medium-sized websites.
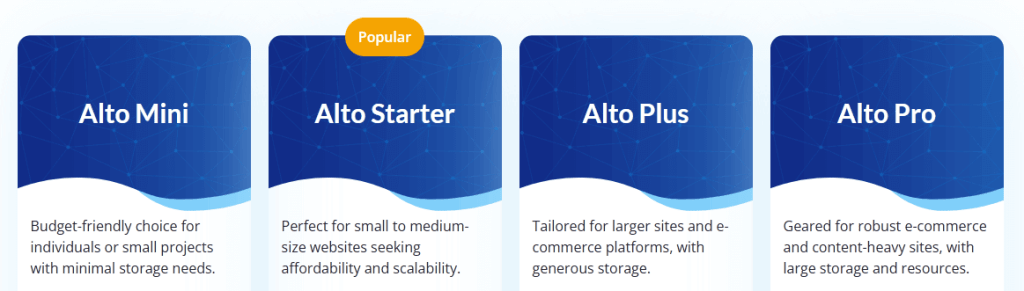
Once you’ve made your decision, select the “Order Now” button to proceed.

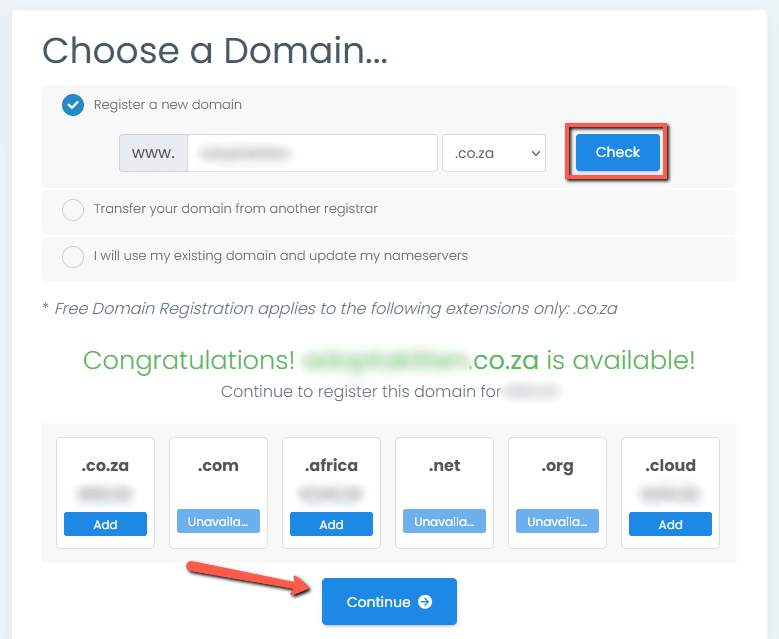
Step 3: Choose Your Desired Domain
Next, you’ll need to choose a domain name for your website. You have the option to register a new domain or transfer an existing one to MCloud9 for easy management. If you already have a domain and don’t want to transfer it, select the “I will use my existing domain and update my nameservers” option. For tips on choosing a great domain name, check out our 10 powerful tips for choosing a domain name for your website.
Once you’ve decided on a domain name, select the “Check” option to see if it’s available, then click the “Continue” button at the bottom of the page. If your desired domain is already taken, consider using a different name or domain extension.
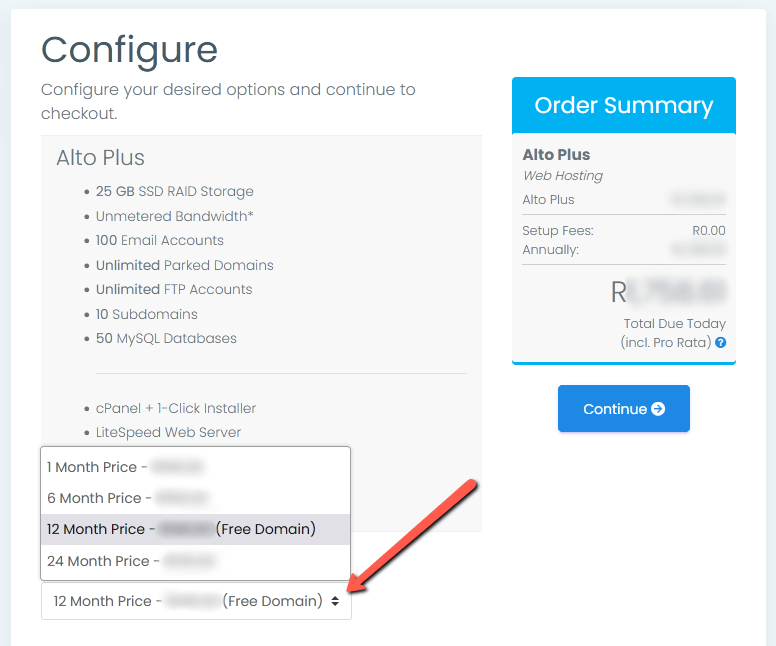
Step 4: Configure Your Billing Cycle
Choose the billing cycle that suits your needs. This determines how often you’ll need to renew your hosting plan. Please note that the free 1-year “.co.za” domain is available only on hosting plans with a billing cycle of 12 months.
Once you’ve made your selection, click “Continue“.
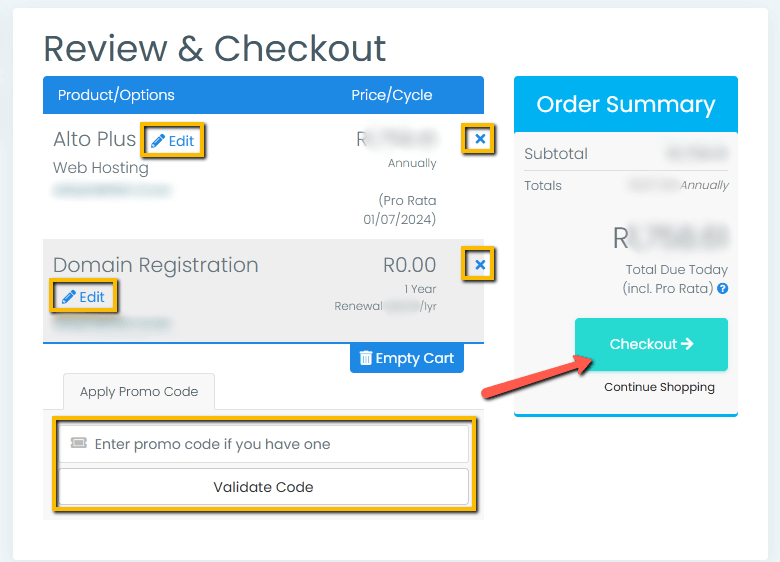
Step 5: Review and Checkout
Review your order to ensure everything is correct. If needed, you can edit or remove items. If you have a promo code, enter it in the ‘Promo Code’ field and click “Validate Code.”
Once you’re satisfied with your order, select “Checkout“.
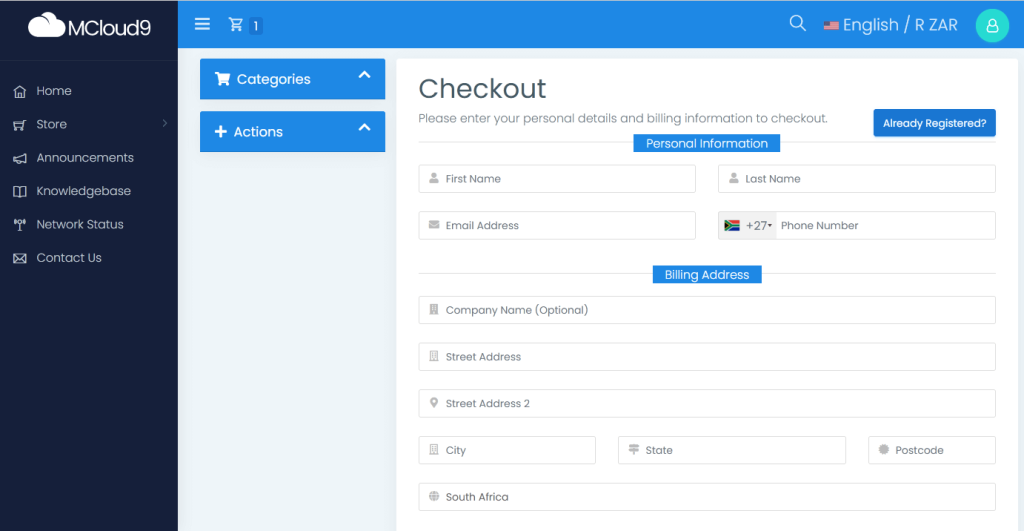
Step 6: Fill In Your Billing Information
Complete the billing information form to proceed with the checkout process. Make sure to read and agree to the Terms of Service, then select “Complete Order“.

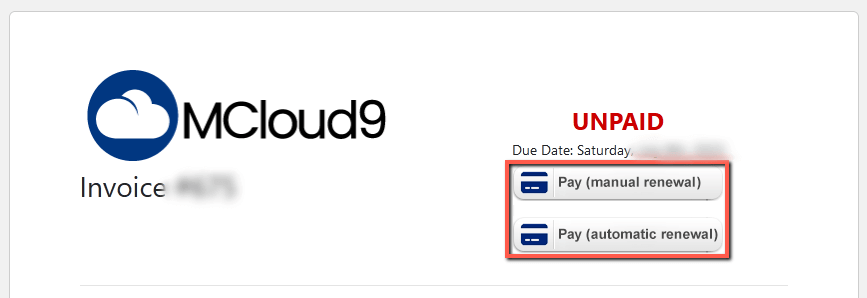
Step 7: View and Pay Your Invoice
On the web hosting invoice page, you’ll find two payment options: “Pay (automatic renewal)” or “Pay (manual renewal)”. The “Pay (automatic renewal)” option automatically renews your services before they expire, while the “Pay (manual renewal)” option requires you to manually renew your services by re-entering your payment details each time.
Choose the option that suits you best.
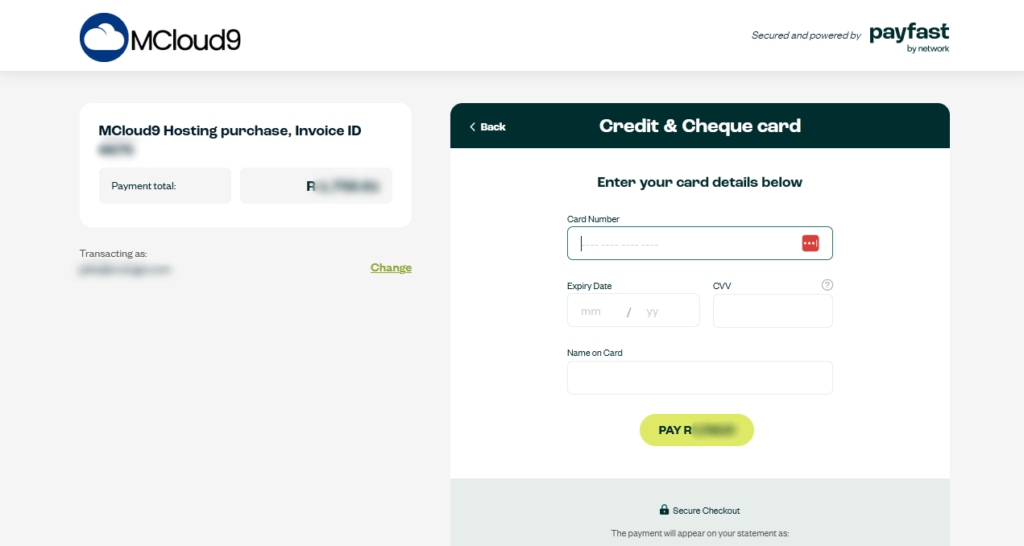
Step 8: Complete Your Payment
You will be redirected to our secure payment gateway. Select your preferred payment method, such as a credit card or debit card, and complete the payment process. We offer a variety of payment methods to ensure a seamless and convenient experience for you.
That’s it! After following these steps you will have successfully purchased web hosting with MCloud9. After completing the payment, you’ll be redirected back to the paid invoice page. Additionally, you’ll receive an email containing your invoice and links to your Client Portal, where you can manage your services. Be sure to save this email in a safe place.
If you need assistance setting up your website and email accounts, our comprehensive self-help knowledgebase provides all the resources you need to get started and our helpful support team is available should you need any assistance.
Advantages of MCloud9 Web Hosting

At MCloud9, we’ve got you covered when it comes to web hosting. Our advantages include awesome customer support, lightning-fast loading times with LiteSpeed web server, SSD storage for improved performance, unmetered bandwidth to handle any amount of traffic, and an intuitive cPanel control panel for easy website management. Plus, we offer a free .co.za domain for the first year, a free SSL certificate for enhanced security, and a one-click installer for popular software. And to ensure your website stays accessible, we guarantee an impressive 99.9% uptime with our reliable infrastructure and robust network. Trust us to keep your website running smoothly around the clock.
FAQ for Buying Web Hosting
Do I need a website before I get web hosting?
No, you can start with web hosting even if you don’t have a website yet. Once you have a hosting plan, you can create and build your website using a popular content management systems like WordPress.
Do I need to renew my web hosting?
Yes, web hosting plans typically require renewal to keep your website active. MCloud9 offers different billing cycles, so you can choose the renewal frequency that suits you best.
How do I get more help?
If you need any assistance with your web hosting order or your account, don’t hesitate to reach out to us. You can contact us anytime via our contact page or directly through our support ticket system. Our support team is here to help you every step of the way.
I already have a website. Can I transfer it to MCloud9?
Absolutely! We offer free migration assistance. Contact our support team, and they will guide you through the process of transferring your website to MCloud9.
In Conclusion
Purchasing a web hosting plan from MCloud9 is an exciting step toward bringing your website to life. With our outstanding customer support, powerful features, and user-friendly control panel, you’ll have everything you need to create a successful online presence. Follow the steps outlined in this guide, and don’t hesitate to reach out if you need any further assistance. We’re thrilled to be a part of your web hosting journey and can’t wait to see your website flourish. Get started with MCloud9 today and unlock the potential of your online presence!
